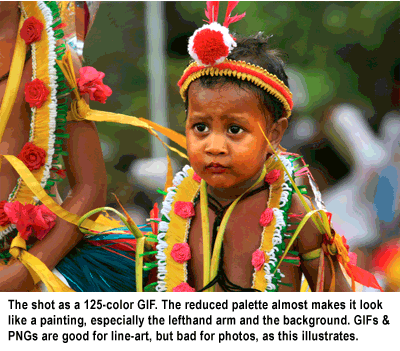
The Internet deals best with certain types of images. JPGs (pronounced "jay-pegs") are optimal for items  that contain photography or large gradients. For text and line-art, like ink-sketches, use PNGs and GIFs (pronounced "ping" and "gif," as in "gift" but without the "t"). Read about the techniques' differences on Webopedia.
Digital cameras typically shoot in RAW, high-resolution JPG or a proprietary format. So you'll need to resave photos in a web-friendly fashion – JPG, GIF or PNG – and bite-size them to suit the net. Most bloggers also compress images, so they download quickly. A slow-loading page, after all, alienates readers and ups the bounce rate (how quickly folks depart the site)...
When image-editing programs squish artworks, they simplify them. Depending on the process, they either remove or compress detail (JPG) or reduce the color palette (PNG/GIF). Thus things get blurry or blocky when you go too low. And yes, that's the cyber equivalent of pancaking on your back during the limbo: Very Very Embarrassing...
No more rum punch for you!
You can tailor PNGs for better results via algorithms, but those controls are only available on more expensive image-editing tools such as Adobe Photoshop Elements. Also, the files produced are larger – and unreadable on Internet Explorer 6. That's a generation or two back, browser-wise, and thus not a huge problem, unless your target audience might not have the latest software (silver surfers, readers in developing nations or places with limited Internet access, etc.).
Answers to frequently asked questions:
How do I compress an image for the Web?
Most image editing programs offer some sort of "Save As," "Save For Web" or "Export" functionality. Each one has the controls in a different place, so check your software's help files for details.
Picasa is a photo cataloging and editing tool from Google available for both Windows and Mac. Use Picasa's "Export to Folder" function to resize and compress photos as JPGs all in one step. By selecting several photos, you can perform the same operation in a batch. Picasa's especially groovy because its web albums sync with Blogger uploads – handy if you want to reuse images.
How much to compress?
Two ways exist to streamline a file: reduce the physical size of the photo or increase the level of compression (or both). Making the image smaller is a good first step for the web, since most monitors can't display an image more than 1,200 pixels wide. These days, even cheap digital point-and-shoots take photos that are 3,000+ pixels.
Many programs allow you to preview compression levels, as you experiment with different intensities via a slider bar. When you start to see a loss of detail or blockiness, ease the slider back a notch or two and you'll be fine.
Otherwise, a compression level of 70 – 85 (out of 100) works well: files retain clarity but still download briskly on most connections.
Some bloggers, myself included (Amanda), size photographs to specific widths, then upload. That method offers more control and also helps when embedding the captions in Photoshop, old-school style... However, it doesn't allow readers to click on an image and examine a larger version. Nor does it allow reuse in different sizes: The shot you ran full-width in a January post could be a great thumbnail in a related July entry.
Programs like Picasa save an original image, then produce three clones: small (144 pixels), medium (288px) and large (400px). Like Goldilocks, you decide which is just right for the task at hand.
You can then grab the embed code off your Picasa web album: click "Link to this Photo" in the right-hand sidebar. We recommend checking "hide the album link" as that eliminates some formatting drama. Then select a size, and cut and paste the "embed image" code into the photo uploader's URL field.
What about images like line-art, screenshots, icons, etc.?
For art with heavy gradients – elaborately inked comics, for example – your best bet is the JPG format. Shorter gradients – as you might find in a site's header image or logo – compress best with GIF or PNG.
Transparency requires a GIF or PNG: helpful for a logo that repeats across various pages with different-colored backgrounds. PNGs rock when you need to fade into transparency and GIFs when you have sharp lines.
Having trouble?
Check out these trouble-shooting tips.


0 comments:
Post a Comment