Wednesday, March 3, 2010

Tinkering with images: software and ethics

Mike has already detailed some Tools for Writing Posts. Following are few more software recommendations...

Photoshop remains the best program for electronic manipulation. It's sold as part of the the Creative Suite 4 family, alongside Flash, Illustrator, Dreamweaver and other goodies. But the price – $999 to $2,499 – can induce sticker shock, so many bloggers turn to its little sister: Adobe Photoshop Elements (free trial, US$139, often bundled). Two other favorites are Google's Picasa download (this dovetails with Blogger's web albums) and the GNU Image Manipulation Program (GIMP).

This freely distributed piece of software is nifty for retouching, composition and image authoring (see this handy post about gimping a header and also notes about modification for Blogger's Minima template. This is the best option for folks who want to create a stylish banner and then not bother with photo-manipulating).

These programs offer deity-like power. Zit begone! Turn grey skies blue! Erase your ex from the family portrait! But give some thought to ethics. A photographer already interprets the world, choosing what to shoot and how to present it (via filters, lighting, focal planes, even special effects in programs like Photoshop, etc.). When does that subjective slice of reality become fiction, though?

Most professionals draw the line at distortions of the truth. Hard-core news shooters even include staged photos in that category. If they can't capture a moment as it unfolds, given the light and elements at hand, the result is a lie.

Digital alterations are a step more verboten for pros. As in "due cause for firing". A landmark 1989 case involved removing a Coke can from, ironically, a snap of amateur photographer Ron Olshwanger celebrating in his Pulitzer for spot-news photography. Twenty years later, Microsoft replaced a black man's head with a white one, leaving the darker hand, for a Polish version of its website. Classy. Technologically and culturally.

And yes, both incidents caused as much flap as you might expect.

The tradition of dodgy photos goes back a long way, from "ghost" shots to a Lincoln portrait and even the seminal image of Marines raising the flag at Iwo Jima, as the New York Times points out. From an oil worker with four hands to National Geographic moving a pyramid, folks have used and abused darkroom processes and digital tools. Here ABC recaps the ten worst episodes of image-manipulation.

Attitudes are shifting. As John Long of the National Press Photographers Association (NPPA) told ABC: now people "don't look at pictures as though they were historical documents, but as things that they want them to be. It's so easy, it's so pervasive, that the nature of photography has become liquid." Still, professionals fight to maintain standards, especially as DIY publishing and user-generated content threatens the mainstream media's dominance – maybe even its existence... Long, once the ethics co-chair for the NPPA, exhorted his colleagues: "Journalists have only one thing to offer the public and that is CREDIBILITY. Without credibility we have nothing. We might as well go sell widgets door to door since without the trust of the public we cannot exist as a profession."

The blogosphere has yet to develop such cohesion and ethics codes. And perhaps it never will, as much of its charm and strength lies in its Wild West freedoms. So you need to decide where your comfort level lies – and how much of that you want to communicate.

Happily, a simple solution exists for pros and bloggers alike: if you alter an image, label it as an illustration.

Why mislead your readers, when an admission builds trust through transparency?

Web-friendly image formats and compression

(Please note, this entry originally appeared in Tips & Tricks. But we're concerned folks aren't interacting with material there as much, so we've folded these components into the lecture.)

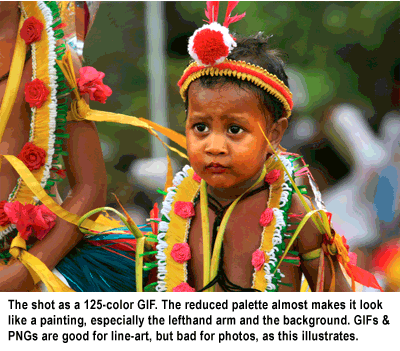
The Internet deals best with certain types of images. JPGs (pronounced "jay-pegs") are optimal for items that contain photography or large gradients. For text and line-art, like ink-sketches, use PNGs and GIFs (pronounced "ping" and "gif," as in "gift" but without the "t"). Read about the techniques' differences on Webopedia.

Digital cameras typically shoot in RAW, high-resolution JPG or a proprietary format. So you'll need to resave photos in a web-friendly fashion – JPG, GIF or PNG – and bite-size them to suit the net. Most bloggers also compress images, so they download quickly. A slow-loading page, after all, alienates readers and ups the bounce rate (how quickly folks depart the site)...

When image-editing programs squish artworks, they simplify them. Depending on the process, they either remove or compress detail (JPG) or reduce the color palette (PNG/GIF). Thus things get blurry or blocky when you go too low. And yes, that's the cyber equivalent of pancaking on your back during the limbo: Very Very Embarrassing...

No more rum punch for you!

You can tailor PNGs for better results via algorithms, but those controls are only available on more expensive image-editing tools such as Adobe Photoshop Elements. Also, the files produced are larger – and unreadable on Internet Explorer 6. That's a generation or two back, browser-wise, and thus not a huge problem, unless your target audience might not have the latest software (silver surfers, readers in developing nations or places with limited Internet access, etc.).


Answers to frequently asked questions:

How do I compress an image for the Web?

Most image editing programs offer some sort of "Save As," "Save For Web" or "Export" functionality.  Each one has the controls in a different place, so check your software's help files for details.

Picasa is a photo cataloging and editing tool from Google available for both Windows and Mac. Use Picasa's "Export to Folder" function to resize and compress photos as JPGs all in one step.  By selecting several photos, you can perform the same operation in a batch. Picasa's especially groovy because its web albums sync with Blogger uploads – handy if you want to reuse images.

How much to compress?
Two ways exist to streamline a file: reduce the physical size of the photo or increase the level of compression (or both). Making the image smaller is a good first step for the web, since most monitors can't display an image more than 1,200 pixels wide. These days, even cheap digital point-and-shoots take photos that are 3,000+ pixels.

Many programs allow you to preview compression levels, as you experiment with different intensities via a slider bar. When you start to see a loss of detail or blockiness, ease the slider back a notch or two and you'll be fine.

Otherwise, a compression level of 70 – 85 (out of 100) works well: files retain clarity but still download briskly on most connections.

Some bloggers, myself included (Amanda), size photographs to specific widths, then upload. That method offers more control and also helps when embedding the captions in Photoshop, old-school style... However, it doesn't allow readers to click on an image and examine a larger version. Nor does it allow reuse in different sizes: The shot you ran full-width in a January post could be a great thumbnail in a related July entry.

Programs like Picasa save an original image, then produce three clones: small (144 pixels), medium (288px) and large (400px). Like Goldilocks, you decide which is just right for the task at hand.

You can then grab the embed code off your Picasa web album: click "Link to this Photo" in the right-hand sidebar. We recommend checking "hide the album link" as that eliminates some formatting drama. Then select a size, and cut and paste the "embed image" code into the photo uploader's URL field.

What about images like line-art, screenshots, icons, etc.?
For art with heavy gradients – elaborately inked comics, for example – your best bet is the JPG format. Shorter gradients – as you might find in a site's header image or logo – compress best with GIF or PNG. 

Transparency requires a GIF or PNG: helpful for a logo that repeats across various pages with different-colored backgrounds. PNGs rock when you need to fade into transparency and GIFs when you have sharp lines.

Having trouble?
Check out these trouble-shooting tips.

Blurry or blocky: Try decreasing the compression. A percentage of 70-85 usually works best for photos.

Color-smudged text: Boost up the text's font size and strength (bold). This will make the original pixel-chunks thicker, so they're less likely to bleed color when compressed. You may need to experiment with increasing the leading (space between lines) and kerning (space between letters) to make the bulkier text look good.

This problem can also be the result of resizing an image after letter additions. Keep original versions of all art, as well as a master file with the text and image layers unflattened (i.e.; both elements can still be edited and aren't yet fused into a unit). Employ "save as" and "save for web" functions to create new, uploadable files. Your digital closet will be more full, but your options will stay open...

Blurry text: some image editing programs, like Photoshop, allow you to choose text parameters: crisp, smooth, sharp, strong, etc.  These options define how letters blend with the background.  Use these as you see fit for the situation. In general, larger fonts look better with smooth aliasing, while smaller fonts need crispness to prevent blurring.

As we mentioned earlier, always copy your art before making any changes. Many compression formats use lossy algorithms: they ditch data. Each time you re-save, the file sheds more and more quality. Opt for TIFFs when possible: they're better at conservation. Some image editors, such as Picasa, only permit JPGs, however, so minimize the number of resaves there.

Wednesday, January 20, 2010

Photo preparation for your blog

  1. Save a copy of your original. Never tinker with your backup.
  2. Reduce the size of your image to a max of 1,200 pixels across.
  3. Convert to a web-friendly format: JPG (photos), GIF or PNG (line art, graphics). Confused? Check out Tips & Tricks for image-compression and troubleshooting it.
  4. Compress 70–85% (if that didn't already occur in step 3).
  5. The file size (not image size: file) should be 12-50k for graphics, less than 100k for photos, unless they are extremely large and detailed (full-post beauties on, say, a pro-photog's site). In that case, 500k is an acceptable cap.
  6. Either upload directly or via a sharing site. All these services allow you to select small, medium or large options and align the image. Cut and paste it to the appropriate place in your post.

Photo captions get complicated quickly. For now, just include credits in italics at the bottom of the relevant post. As the course grows nerdier, we'll explore options from Flickr imports to Blogger’s built-in tools.

Friday, December 31, 1999

Image compression troubleshooting tips

Blurry or blocky: Try decreasing the compression. A percentage of 70-85 usually works best for photos.

Color-smudged text: Boost up the text's font size and strength (bold). This will make the original pixel-chunks thicker, so they're less likely to bleed color when compressed. You may need to experiment with increasing the leading (space between lines) and kerning (space between letters) to make the bulkier text look good.

This problem can also be the result of resizing an image after letter additions. Keep original versions of all art, as well as a master file with the text and image layers unflattened (i.e.; both elements can still be edited and aren't yet fused into a unit). Employ "save as" and "save for web" functions to create new, uploadable files. Your digital closet will be more full, but your options will stay open...

Blurry text: some image editing programs, like Photoshop, allow you to choose text parameters: crisp, smooth, sharp, strong, etc.  These options define how letters blend with the background.  Use these as you see fit for the situation. In general, larger fonts look better with smooth aliasing, while smaller fonts need crispness to prevent blurring.

As we mentioned earlier, always copy your art before making any changes. Many compression formats use lossy algorithms: they ditch data. Each time you re-save, the file sheds more and more quality. Opt for TIFFs when possible: they're better at conservation. Some image editors, such as Picasa, only permit JPGs, however, so minimize the number of resaves there.

Sunday, January 31, 1999

Web-friendly image formats and compression

The Internet deals best with certain types of images. JPGs (pronounced "jay-pegs") are optimal for items that contain photography or large gradients. For text and line-art, like ink-sketches, use PNGs and GIFs (pronounced "ping" and "gif," as in "gift" but without the "t"). Read about the techniques' differences on Webopedia.

Digital cameras typically shoot in RAW, high-resolution JPG or a proprietary format. So you'll need to resave photos in a web-friendly fashion – JPG, GIF or PNG – and bite-size them to suit the net. Most bloggers also compress images, so they download quickly. A slow-loading page, after all, alienates readers and ups the bounce rate (how quickly folks depart the site)...

When image-editing programs squish artworks, they simplify them. Depending on the process, they either remove or compress detail (JPG) or reduce the color palette (PNG/GIF). Thus things get blurry or blocky when you go too low. And yes, that's the cyber equivalent of pancaking on your back during the limbo: Very Very Embarrassing...

No more rum punch for you!

You can tailor PNGs for better results via algorithms, but those controls are only available on more expensive image-editing tools such as Adobe Photoshop Elements. Also, the files produced are larger – and unreadable on Internet Explorer 6. That's a generation or two back, browser-wise, and thus not a huge problem, unless your target audience might not have the latest software (silver surfers, readers in developing nations or places with limited Internet access, etc.).


Answers to frequently asked questions:

How do I compress an image for the Web?

Most image editing programs offer some sort of "Save As," "Save For Web" or "Export" functionality.  Each one has the controls in a different place, so check your software's help files for details.

Picasa is a photo cataloging and editing tool from Google available for both Windows and Mac. Use Picasa's "Export to Folder" function to resize and compress photos as JPGs all in one step.  By selecting several photos, you can perform the same operation in a batch. Picasa's especially groovy because its web albums sync with Blogger uploads – handy if you want to reuse images.

How much to compress?

Two ways exist to streamline a file: reduce the physical size of the photo or increase the level of compression (or both). Making the image smaller is a good first step for the web, since most monitors can't display an image more than 1,200 pixels wide. These days, even cheap digital point-and-shoots take photos that are 3,000+ pixels.

Many programs allow you to preview compression levels, as you experiment with different intensities via a slider bar. When you start to see a loss of detail or blockiness, ease the slider back a notch or two and you'll be fine.

Otherwise, a compression level of 70 – 85 (out of 100) works well: files retain clarity but still download briskly on most connections.

Some bloggers, myself included (Amanda), size photographs to specific widths, then upload. That method offers more control and also helps when embedding the captions in Photoshop, old-school style... However, it doesn't allow readers to click on an image and examine a larger version. Nor does it allow reuse in different sizes: The shot you ran full-width in a January post could be a great thumbnail in a related July entry.

Programs like Picasa save an original image, then produce three clones: small (144 pixels), medium (288px) and large (400px). Like Goldilocks, you decide which is just right for the task at hand.

You can then grab the embed code off your Picasa web album: click "Link to this Photo" in the right-hand sidebar. We recommend checking "hide the album link" as that eliminates some formatting drama. Then select a size, and cut and paste the "embed image" code into the photo uploader's URL field.

What about images like line-art, screenshots, icons, etc.?

For art with heavy gradients – elaborately inked comics, for example – your best bet is the JPG format. Shorter gradients – as you might find in a site's header image or logo – compress best with GIF or PNG. 

Transparency requires a GIF or PNG: helpful for a logo that repeats across various pages with different-colored backgrounds. PNGs rock when you need to fade into transparency and GIFs when you have sharp lines.

Having trouble?
Check out these trouble-shooting tips.